
Appearance
3
3SPOS
ActiveCloud-based point of sale system designed for restaurants and hospitality businesses. This integration enables seamless synchronization between 3SPOS and POS Hub for menu management and order flow.
10-15 minutes
1 Region
Medium
Overview
3SPOS is a cloud-based point of sale system designed for restaurants and hospitality businesses. This integration provides seamless synchronization between your 3SPOS POS and POS Hub, enabling automated menu sync via webhooks, order injection with status updates, order cancellation, and real-time availability updates.
Key Features:
- Push-based Menu Sync: Menus are pushed from 3SPOS to POS Hub via webhooks
- Real-time Availability: Update item availability using PLU codes
- Order Injection: Orders from connected marketplaces are automatically sent to 3SPOS
- Order Status Updates: 3SPOS sends status updates (sync_status and prep_stage) back to POS Hub to keep order status synchronized
- Order Cancellation: Orders can be cancelled in POS Hub and the cancellation is automatically sent to 3SPOS
- Business Hours Sync: Operating hours are synchronized from 3SPOS menu data
- Multi-location Support: Supports multiple locations in a single webhook payload
Supported Regions
🇬🇧United Kingdom
Supported Features
Catalog Sync
CategoriesSynchronizes menu categories and organizational structure
Products & VariantsSyncs products, items, and their variants
Modifier GroupsSynchronizes modifier group structure
ModifiersSyncs individual modifiers and options
ImagesProduct and category image synchronization
Nutritional InfoNutritional information and calorie data
Dietary InfoDietary restrictions and allergen information
Order Integration
Order InjectionInject orders from POS Hub into 3SPOS. Supports order cancellation when orders are cancelled in POS Hub.
Receive POS OrdersReceive order status updates from 3SPOS. 3SPOS sends sync_status (order acceptance/rejection) and prep_stage (in_kitchen, ready_for_collection, collected) updates back to POS Hub.
Configuration
Business HoursSynchronize standard operating hours
Collection/Delivery HoursSeparate hours for pickup and delivery services
Tax RatesTax rate configuration and synchronization
Special HoursHoliday and special event hours
Legend:✅ Supported|⚠️ Partial|❌ Not Supported|🔄 Coming Soon
Onboarding
Prerequisites
Before you begin, ensure you have:
Active 3SPOS account with administrative access
Active POS Hub Location
3SPOS Location ID from your 3SPOS system
Setup Guide
1
Install 3SPOS Application in POS Hub
1-2 minBegin by installing the 3SPOS integration from your POS Hub location
- From your POS Hub account, navigate to the location where you want to install the 3SPOS application
- Click on the APPS tab
- Select Point of Sale and locate the 3SPOS application
- Click on the Install button
2
Enter Your 3SPOS Location ID
1-2 minConnect your 3SPOS location to POS Hub
- After installation, you will see the 3SPOS connection page
- Enter your 3SPOS Location ID in the provided field
- Click "Connect to 3SPOS" to save the connection
- Wait for the connection to be verified (usually instant)
Your 3SPOS Location ID can be found in your 3SPOS system settings or by contacting 3SPOS support
3
Publish Your Menu from 3SPOS
5-10 minConfigure webhooks in 3SPOS to push menu data to POS Hub
- Log into your 3SPOS back-office system
- Navigate to Products & Stock > App & Online Menus
- Select your Sales Channel (e.g., Poshub_Delivery or Poshub_Collection)
- Select the Branch/Location you want to publish
- Verify your menu is enabled
- Click the "Publish Menus" button to send your menu to POS Hub
See the "For Clients" section below for detailed instructions on publishing menus and managing availability
For Developers: Credentials & Configuration
This section is for POS Hub developers setting up the 3SPOS integration for clients.
Details shared by POS Hub team to the 3s POS Team
Common and One-Time Configuration
These details are configured once in the 3SPOS client record and shared with the 3SPOS team. They apply to all locations:
Webhook URLs
The following webhook endpoints need to be configured in the 3SPOS system. These URLs are the same for all clients:
Menu Webhook:
Used by 3SPOS to send menu data to POS Hub. 3SPOS will push menu updates to this endpoint whenever menus are published.
Availability Webhook:
Used by 3SPOS to send real-time availability updates for products and modifiers. The locationId parameter identifies which POS Hub location the update applies to.
Order Status Webhooks (sync_status):
Used by 3SPOS to notify POS Hub when an order is accepted or rejected. The orderId in the path identifies the specific order.
Order Status Webhooks (prep_stage):
Used by 3SPOS to send order preparation stage updates (in_kitchen, ready_for_collection, collected). The orderId in the path identifies the specific order.
Menu API Key
- Authentication key required for menu and availability webhooks
- Used to authenticate incoming menu and availability webhook requests
- Configured once in the 3SPOS client record and shared with 3SPOS team
Order Status Updates Username
- Username for Basic Authentication when 3SPOS sends order status updates (sync_status and prep_stage)
- Required if order status updates are needed from 3SPOS
- Configured once in the 3SPOS client record and shared with 3SPOS team
Order Status Updates Password
- Password for Basic Authentication when 3SPOS sends order status updates (sync_status and prep_stage)
- Required if order status updates are needed from 3SPOS
- Configured once in the 3SPOS client record and shared with 3SPOS team
Details shared by 3s POS team to the POS Hub Team
Common and One-Time Configuration
These credentials are configured once in the 3SPOS client record and apply to all locations:
- Order API Password
- Password used for HMAC signature generation when POS Hub sends orders to 3SPOS
- Required for order injection to 3SPOS
- Configured once in the 3SPOS client record and provided by the 3SPOS team
Unique for Each Location
These details are different for each location/client being onboarded:
- Location ID
- Unique identifier for the location in 3SPOS system
- Required for connection setup between POS Hub location and 3SPOS location
- Different for each location/client
- Used to identify which 3SPOS location corresponds to which POS Hub location
- Can be found in 3SPOS system settings
- Entered by the client in POS Hub during onboarding process
Testing the Integration
Test Menu Webhook:
- Have client send a test menu webhook from 3SPOS
- Verify API key authentication
- Check menu conversion and import
Test Order Injection:
- Create a test order in POS Hub
- Verify order is sent to 3SPOS with correct signature
- Confirm order appears in 3SPOS system
Test Availability Updates:
- Have client send availability webhook
- Verify PLU code matching
- Check product availability updates in POS Hub
Test Order Status Webhooks:
- Have client send sync_status or prep_stage webhook
- Verify Basic Auth authentication
- Check order status updates in POS Hub
For Clients: Menu Publishing & Availability Management
This section guides clients on how to use the 3SPOS integration after it's been set up.
Publishing Your Menu
To sync your menu from 3SPOS to POS Hub:
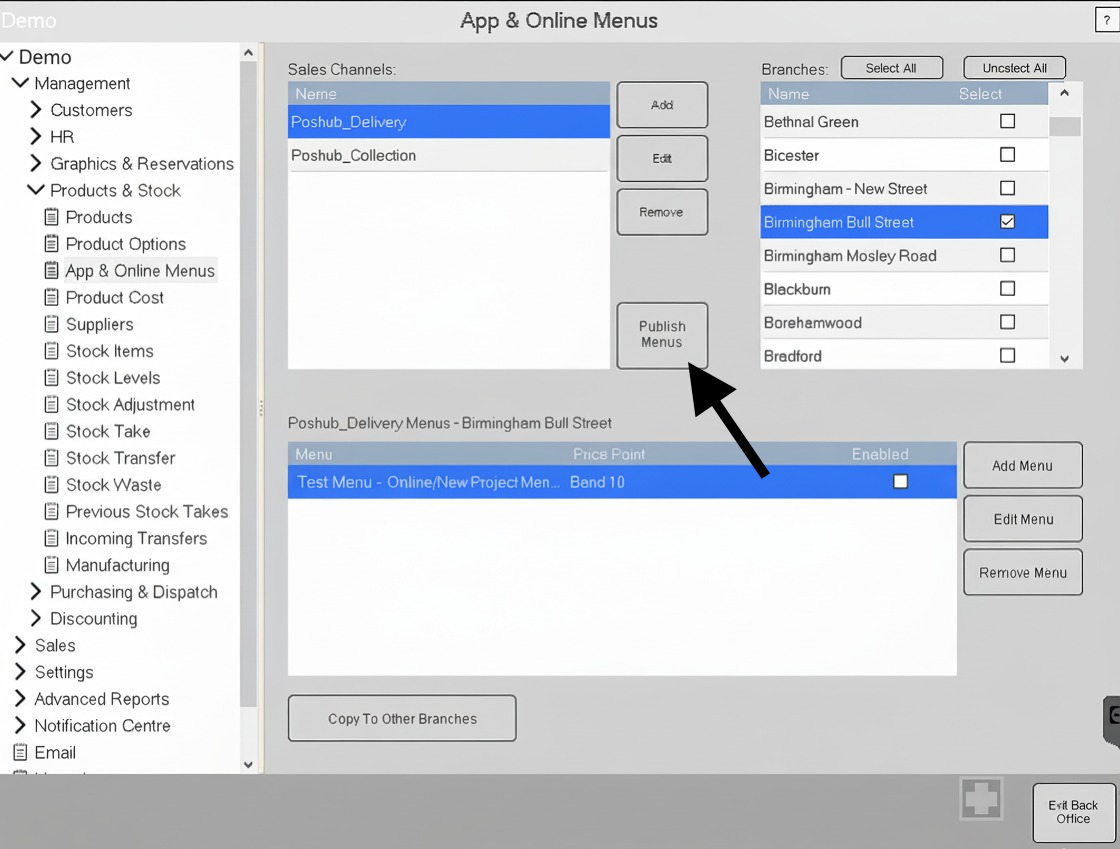
Navigate to App & Online Menus
- Log into your 3SPOS back-office system
- In the left navigation pane, expand "Products & Stock"
- Click on "App & Online Menus"
Select Sales Channel
- In the "Sales Channels" section, select the channel you want to publish
- Common channels include:
- Poshub_Delivery - For delivery orders
- Poshub_Collection - For pickup/collection orders
- You can add, edit, or remove sales channels using the buttons on the right
Select Branch/Location
- In the "Branches" section, select the location(s) you want to publish menus for
- Use "Select All" or "Unselect All" to quickly manage multiple branches
- Only selected branches will have their menus published
Verify Menu Configuration
- Below the branch selection, you'll see the menus for the selected channel and branch
- Ensure your menu is listed and has the "Enabled" checkbox checked
- You can add, edit, or remove menus using the buttons on the right
- Use "Copy To Other Branches" if you want to apply the same menu configuration to multiple locations
Publish Menus
- Click the "Publish Menus" button (located centrally between the Sales Channels and Branches sections)
- This will send your menu data to POS Hub via the configured webhook
- Wait for the confirmation message that the menu has been published successfully
- Verify Menu in POS Hub
- Log into your POS Hub account
- Navigate to your location
- Go to the Menu section
- Verify all categories, items, and modifiers appear correctly
- Check that prices and images are synced properly
TIP
Menu publishing is push-based - you must publish from 3SPOS whenever you make menu changes. The menu will automatically sync to POS Hub and then to your connected marketplaces.
Marking Items as Unavailable
To mark items as unavailable (so they won't appear on marketplaces):
- Access Online Item Availability
- Log into your 3SPOS system
- Navigate to Sale
- Click on Online Item Availability button

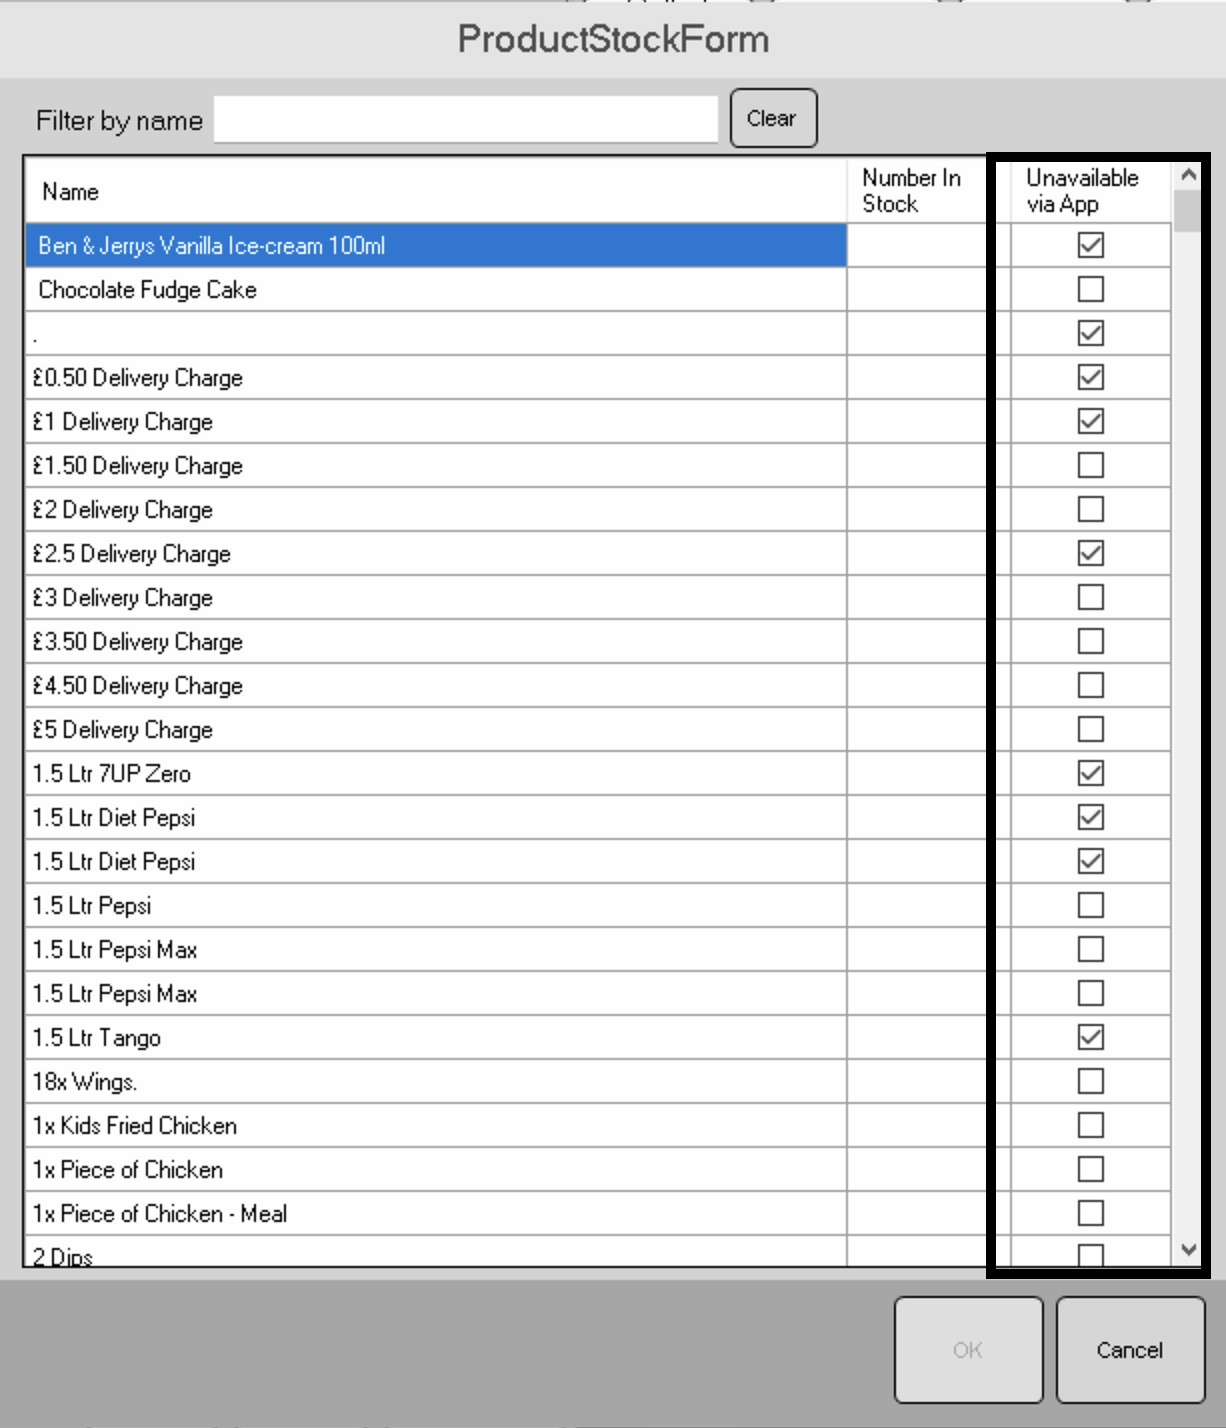
- Mark Items as Unavailable
- In the ProductStockForm window, you'll see a list of all your menu items
- Use the "Filter by name" field to quickly find the item you want to update
- Locate the item in the table
- Check the "Unavailable via App" checkbox to mark the item as unavailable
- Uncheck the checkbox to make the item available again
- Click OK to save your changes
- Automatic Sync
- Once you save the changes, the item availability will automatically sync to POS Hub
- The updated availability will reflect on connected marketplaces
- No need to republish the menu - availability updates happen in real-time
Updating Business Hours
Business hours are automatically synced from your 3SPOS menu data. You can configure active times for each menu to control when it's available:
- Access Menu Configuration
- Log into your 3SPOS system
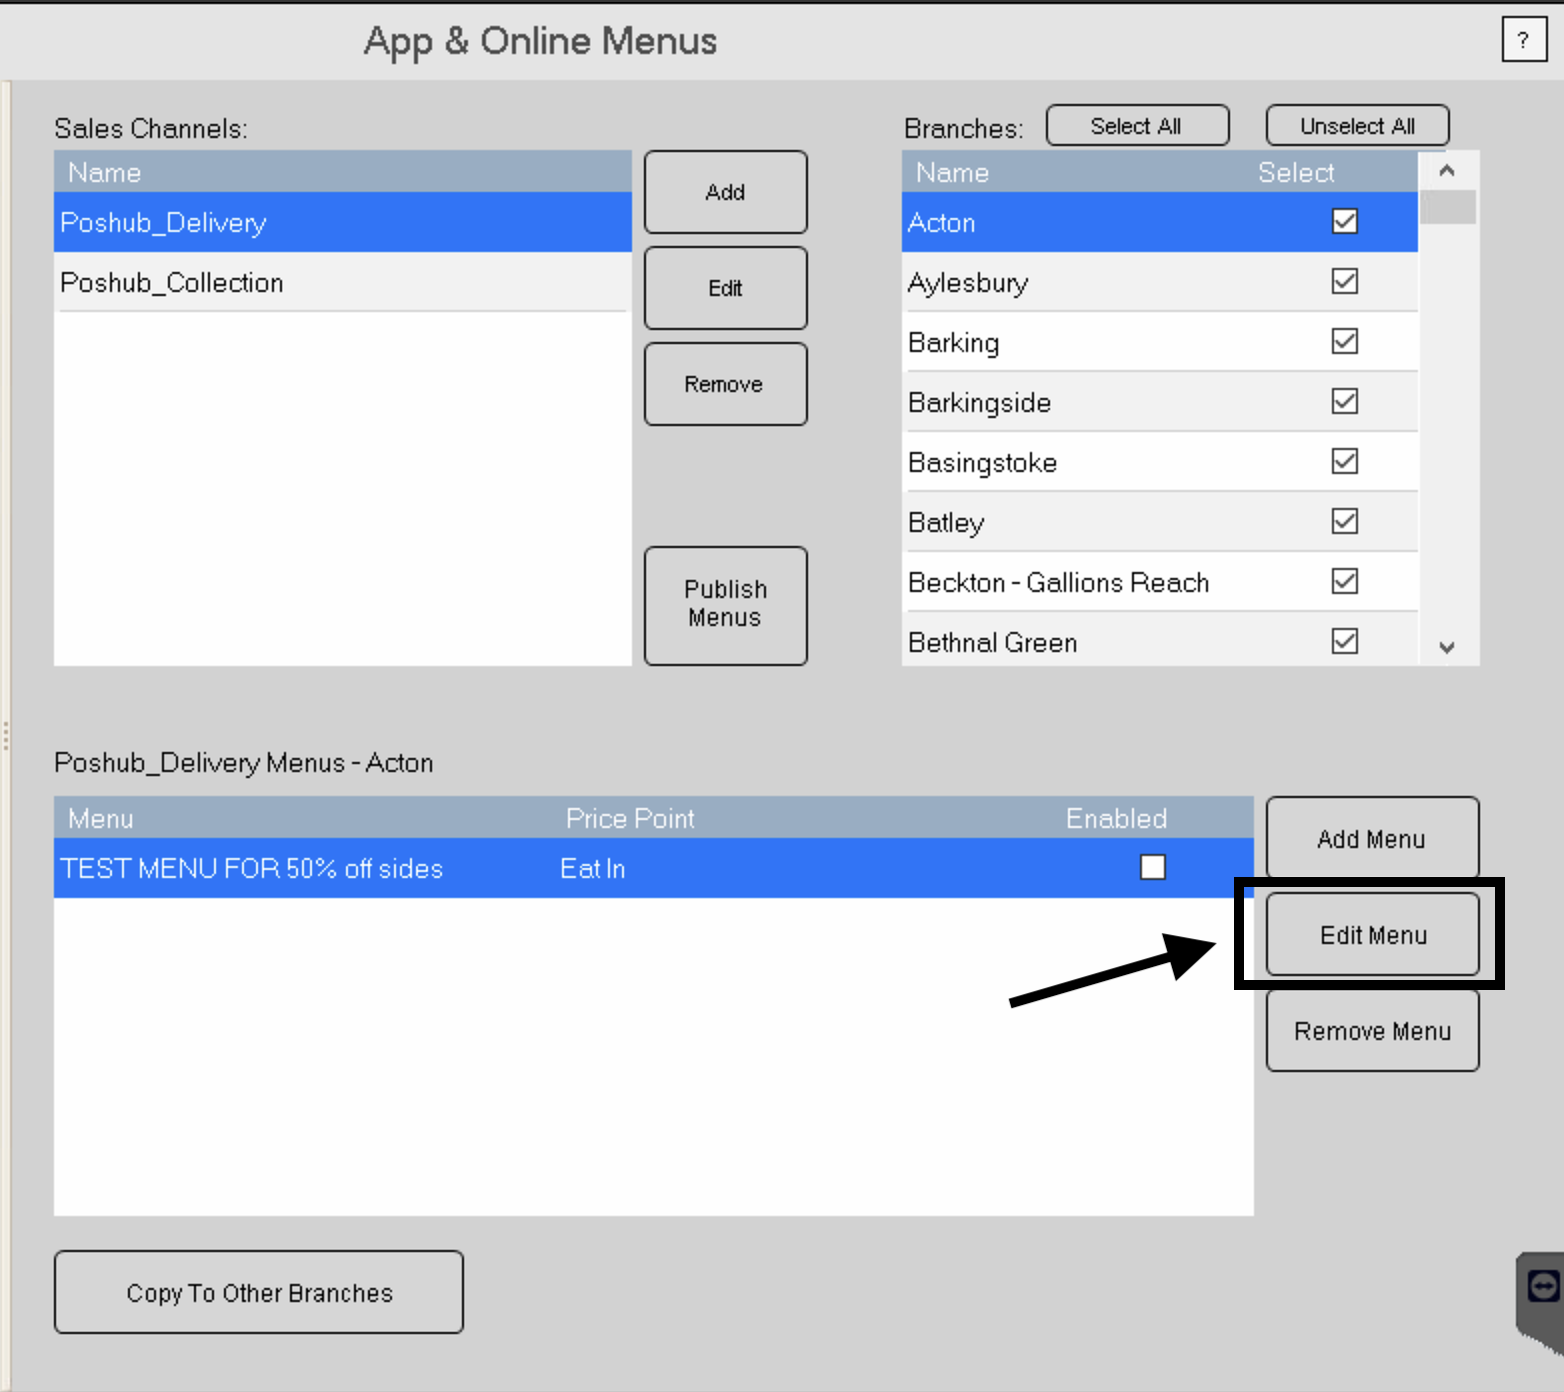
- Navigate to Products & Stock > App & Online Menus
- Select your Sales Channel (e.g., Poshub_Delivery or Poshub_Collection)
- Select the Branch/Location you want to configure
- In the menu list, select the menu you want to update
- Click Edit Menu button
- Configure Active Times
- In the Online Menu configuration window, you'll see the Active Times section
- Select the Menu and Price Point from the dropdown menus
- To add active time slots, click the Add button in the Active Times section
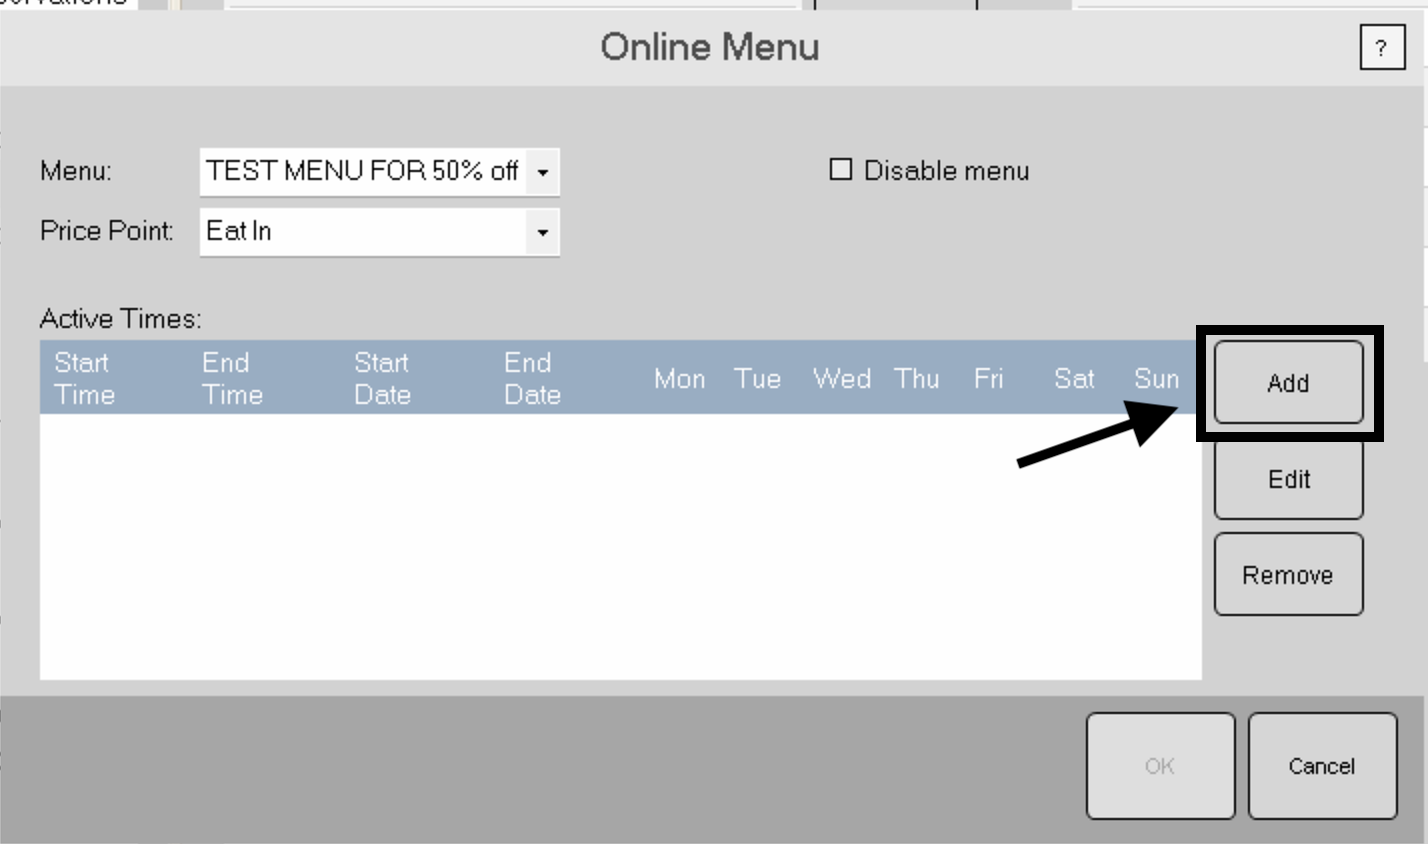
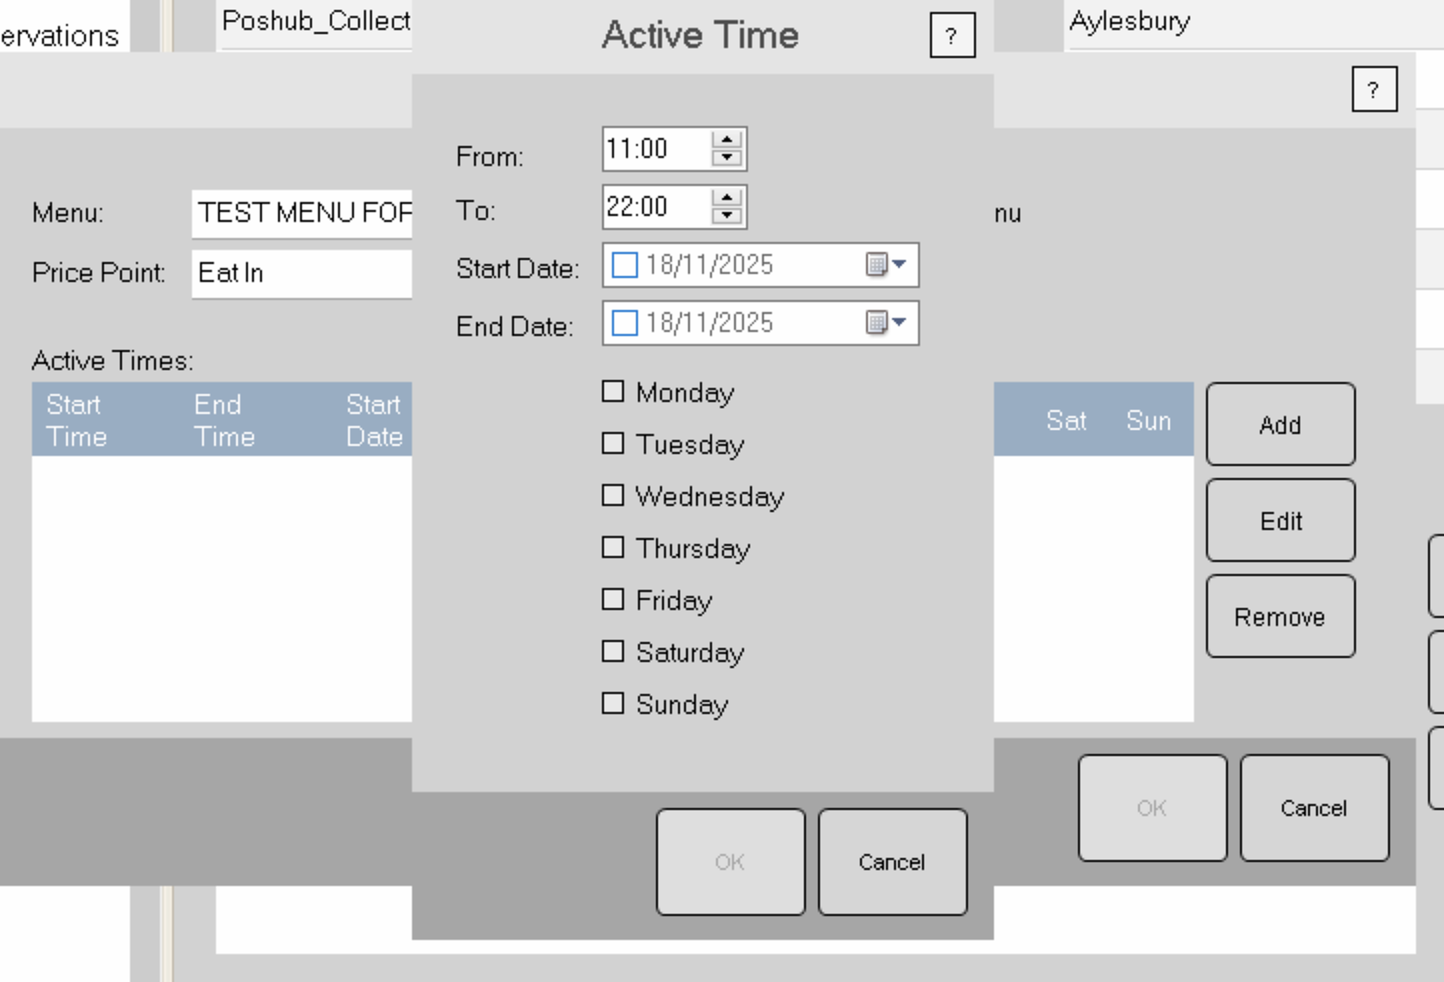
- Set Time Range and Days
- In the Active Time modal, configure the following:
- From and To times: Set the start and end time (e.g., 11:00 to 22:00)
- Start Date and End Date: Optionally set date ranges (leave unchecked for ongoing availability)
- Days of Week: Check the days when the menu should be active (Monday through Sunday)
- Click OK to save the active time configuration
- Repeat to add multiple time slots if needed (e.g., lunch hours and dinner hours)
- In the Active Time modal, configure the following:
- Save and Publish
- Click OK in the Online Menu configuration window to save your changes
- Return to the App & Online Menus page
- Ensure your menu has the Enabled checkbox checked
- Click Publish Menus to sync the updated hours to POS Hub
- The business hours will automatically sync to POS Hub and reflect on connected marketplaces
Managing Multiple Menus
If you have multiple menus (e.g., Delivery Menu and Collection Menu):
Publish All Menus
- Include all menus in a single webhook payload
- The
restaurantsarray should contain all location IDs - Each menu will sync to its corresponding POS Hub location
Menu Types
DELIVERY: Menu for delivery ordersCOLLECTION: Menu for pickup/collection orders- Both types can be synced simultaneously
Multiple Sales Channels
- You can have separate sales channels for different purposes
- Each sales channel can have its own menu configuration
- Publish each sales channel separately to sync different menus
Configuration Options
After completing the onboarding process, you can manage the following:
Disconnect Integration
- Disconnect: Removes the connection between POS Hub and 3SPOS
- Note: You must also cancel the integration in your 3SPOS system
- Reconnect: Simply re-enter your Location ID to reconnect
To disconnect:
- Navigate to the 3SPOS app page in POS Hub
- Click "Disconnect Integration" button
- Confirm the action
- Cancel the integration in your 3SPOS system
Additional Notes
Menu Publishing
Menu synchronization is push-based from 3SPOS. You must publish your menu from 3SPOS whenever you make changes. The menu will automatically sync to POS Hub and then propagate to connected marketplaces.
Availability Updates
For real-time availability updates, use the availability webhook with PLU codes. This is faster than republishing the entire menu and ensures immediate updates across all marketplaces.
PLU Code Consistency
Ensure PLU codes remain consistent. Changing PLU codes can break availability updates and cause items to not match between systems.
Order Status Updates
Order status updates from 3SPOS (sync_status and prep_stage) require Basic Authentication credentials. Ensure these are configured in the client record for order status synchronization to work.